Sunday, February 28, 2010

Slow going.

Ok so spent another 7-8 hours on her today. time vs progress is rediculously slow when you have to custom shape all the panels. I finished welding in a new plate for the wheel arch then cut out the very complex jigsaw puzzle (of which half is missing) piece that is the support for the bottom of the rear right fender. I've got to custom shape this part and fix the inside runner area before i can make and attach the new bottom (costmetic) rear fender piece. My target is by wednesday to have the whole bottom right area "done"

As I told Craig, If i can get all the rust repairs done within the next month ill be happy. its extreamly time consuming and theres a lot of it.


Anyway...

Here is a picture of the new plate in the rear right wheel arch area. as you can see there is a 2mm gap between it and the brace (the boot panel on its way from america has a lip that goes in there and gets 'spot' welded too the wheel arch and the trunk floor brace.

Here is a picture of the area after the rusted fender brace has been cut out. it also extends the quarter forwards and seals from behind so its quite a complex piece.
Here is a new piece tac-welded in being shaped to suit. After this piece is done i'll tac weld in the two parts which will make up the angled area which gives the wheel arch edge its shape. (and they're just the supports
When all that is done i'll have to cut and replace a little rust on the inside of the rear quarter sealing panel before i then finally make the cosmetic piece and weld that in. When thats done i'll spray it all with epoxy primer, seal it with sealer and then spray the back and inside of the panels with the 3m schultz. Then finally i can move onto other rust area's and do other repairs.
We also are planing to epoxy primer the 2 drivers side doors and boot panel tomorow so we can put them into storage until we're ready to start the bodywork when all the damn rust repairs are finally finished.

Saturday, February 27, 2010

Day1 Long weekend.

Ok, So many hours spent today cleaning up the rear right side of the car. gota go backwards to go forwards.... Once i start welding in the new panels i've dummied up tomorow hopefully it'll start looking a bit more like a car are less like a rustbucket. I'm glad Craig's decided to order the boot panels (all 3) that's going to give a much better finish in the boot and also going to allow a much better seal all arround the outside which was rusted out and now i can replace.

Anyway I gotta go out so gona make this short only 3 pictures.


Here is the rust in the rear right wheel arch getting cut out. Behind it the rear left trunk floor panel connects to it (at the line where it's rusted out). and also a brace that connects the boot flow too the chasis rail (can see this brace in one of the next pictures.)


Ok this is the same area with the rusted metal cut out and the face of the rear brace cleaned up. as you can see it connects the area too the chasis rail. Unfortunatly water has been sitting in this but its ok. It'll get wire brushed. treated, and then painted with cold galv to stop it rusting anymore. (once again the bottom of the car will be getting coated with 3m Schultz (ruburised / bitchemised underbody car sealer)


This is a picture showing the ammount of affected metal removed so far from the rear right area. LOTS.

Tuesday, February 23, 2010

glimpse the future.

Nothing new done today except i brought some new tools to make the rust repair easier. a few more to buy on thursday got a huge day at work tomorow so no work probably then either but 4 day weekend coming up with solid time on it and i cant wait to make some real progress on all this rust ><

As a bonus craigs sent me a link of the engine and rims he's sourced for her when he gets her back. Oh and 'metalicar' as a demo of what she'll look like when finished, or at least what we're aiming for :P


Monday, February 22, 2010

after work party.

Good news!
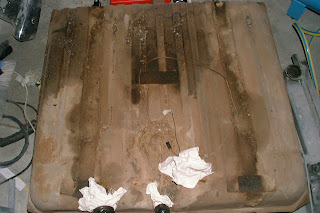
The fuel tank isnt rusted - just dirty.


Bad news!


This is the bottom section of the rear drivers die fender that had to be removed due to massive rust.
This is the rust behind that section of panel that was removed. going all the way into the wheel arch. and into the boot cavity. fixing this will be time consuming.


Bottom of the inside of the panel that the part i removed was spot welded too. Also rusted and requiring replacement.


The drivers rear wheel arch area rusted through into both the inside bracket for the rear fender and the boot area. also requiring work.


This job just gets bigger and bigger and bigger. its insane. never the less no point doing it half assed all the rust will be cut out and fresh metal welded in. hoping to get all the supports for this rear fender and the skin welded on by friday then on sat/sun/mon/tue i can do some of the many other rust repairs.

Sunday, February 21, 2010

Marco ... Polo.

Good news!
this section of the post will be nice and short, The drivers doors and front fender have been finished at least the rust removal and fresh metal installing part. They'll be epoxy primed shortly after being metal prepped. Then i'll spray the 3m schult on the backs and use sealer where necissary. Then those panels can go into storage until im ready to assemble the car for the bodywork stage.


Bad news!

Firstly we're going to be manufacturing the trunk floor from plate steel which means cutting off the support panels for the stock item then mounting those to the new plate and jigging up the new plate this is time consuming and a lot more effort for me :(


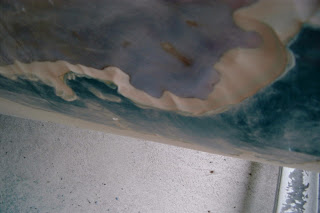
Secondly the bottom off the window sills is missing completely (see picture below). This is going to be fun....


The worst part of the boot pan is removed to i can get to the inside of the rear quarter, the rust has also grown into the wheel arch area and will need to be cut out and replaced :\...


Oh and the rust on the bottom of the rear quarter goes about 250mm up along the WHOLE LENGTH of the rear fenders. and also as you can see in the picture the rear support panel including inside wheel arch is absolutly rotted out. there was up to 20mm of bog in there and the adhesive pads and even some bronzing a lot of bandaid solutions which mean EVEN MORE WORK for me >< and delay for Craig. :\ as im going to have to redo the entire rear support panel aswell as the front cosmetic panel ... where both join the rear off the car and where they join the wheel arch.... huge... effort without a parts car.


Saturday, February 20, 2010

slow but steady


The paint is so thick that after 3 thick coats of paintstripper you're still left with this... not to mention as you can see bog on the rear left side.


An example of the bog on the rear left fender - approximatly 10mm thick.


Rust repair to the front drivers door is complete, new metal is welded in.


Epoxy paint is sprayed onto the inside of the panel before i welded the new sheet in. Tomorow i will put sealer in it and also some 3m schutz over that to stop water ever sitting in there again.

So basicly thats it for today the progress is slow but steady, my assistant has started using paint removing pads on the grinder to remove paint as the stripper is painfully slow considering how thick both the paint and bog are. By the end of tomorow both drivers doors should be fully epoxy primed and ready to be put asside untill the rest of the body catches up and she's ready to be re-assembled after epoxy priming at which stage i can begin the body work in ernest.
As I've explained to Craig this will take longer then originally thought because of the sheer number or rust and dent repairs to be made compared to the number we were originally aware of.
I've located aplace in america you can order the 3 panels that make up the entire trunk and shown Craig he's going to look into it and get back to me, I suggested this altnernative to me custom maknig a trunk floor as its faster, easier and the finished product will be much neater.

Friday, February 19, 2010

Slept in :S

Slept in today boo hiss, so im gona be up late grinding and welding though i have to wake up early to go to paintshop and get the stuff I need assuming the money is in tonight. actually having said that i just realised I need the epoxy primer to do the inside of the metal before i weld the new plates in ><><
Anyway took some quick pictures of the area's that have been removed from both doors and from the front fender (1 spot), and a picture of the trunk and side side rear fenders and top of the rear fender.
so i'll put those in and give us a starting point for this blog.


This is the rear of the drivers front door, as you can see I had to weld in a new backing plate due to serious rot. I will epoxy prime this before i put the new plate into the door skin.


This is the patch that was removed on the front of the drivers door. Same as the rear section I want to wait until I have cleaned up and epoxy primed the inside before i weld the new plate on and then seal it.


This is the rear of the drivers back door. only a small patch that was just starting to come through, cut both corners out to ensure it doesnt return in our lifetime (if its garaged).


Rear door front patch removed to be replaced.


This is the support panel for the rear of the front fender as you can see water got trapped between this and the fender skin, massive rot in both panels (a little adhesive pad with shitloads of bondo was used to cover this up), it also has damage along the trailing vertical edge that will require another new bit to be welded into the fender (total of 3) more pictures to come.


An example of the boot floor pan which is rotten.


This is the rear fender although i havnt fully 'explored' the rust and wont do until the boot pan is removed so i can better access everything i have to replace in there. im worried there will be significant rust build up on the inside of the fenders due to the situation the vehicle was obvoiusly 'stored' or parked in.
An example of the rust which is appearing on the top front of the rear fenders, a strange place in my opinion i wouldnt of expected to see it here.

Thursday, February 18, 2010

Got a camera!

Its 2am on Friday the 19th/2/2010. I've had the car since last tuesday.

The owner is Craig sumpton and we're doing a full repair / respray on a 1967 Chev Impala.

The purpose of this is to provide a progress report for Craig so he can keep up to date with the repairs being made and the process I went through to repair his car.

Well what began as a respray job with a few rust repairs has turned into a full blown back to metal all rust removed (which was a LOT more then though as its all been hidden by a cheep and nasty paint job prevoiusly) can you say BONDO!(bog!).

Im in the process of stripping the car (paint) doing the removable panels first as I find it easier to do the repairs with the panels off so i can flip em all arround also then I can get right into them as i want to epoxy prime the whole thing and put some 3M Schutz on the inside of the doors to act as sound deadener and also water proofing, Seam sealer on the bottom of the doors to prevent water sitting in the sills again.

So far I've stripped 3 panels and have begun repairs on those.

Drivers door front - Rust in both front and rear bottom corners, in the rear spot there is rust in the backing plate aswell. Replacing all of this with fresh metal. 3 seperate dents to repair one that begins in this panel and then carry's on throughout the entire rear door.

Drivers door rear - Rust in both front and rear bottom corners, a dent that extends halfway up accross the whole length of the panel.

Drivers front fender - Rust in the bottom rear of the fender (large area) plus rust in the structual panel that runs behind it, a poor repair from a crash into the front of the wheel arch area has caused rust that section of it needs to be replaced and finally rust along the back edge also from the structual support trapping water.

I've got 3 solid days working on it coming up and a 4 day weekend next week with my assistant (girlfriend chloe) also putting in some hard yards doing the exciting menial tasks which gives me the freedom to do repairs while she strips the paint.

I've borrowed a digi camera from a friend for the purpose of keeping this block up to date with a visual reference for Craig, Also if at some point in the future he decides to sell the car he will be able to display exactly what repairs have been carried out to any prospective buyer.

The biggest tasks to date is going to be everything in the rear trunk the rear fenders are the most worrying part for me as there is rust at the top of those when i cannot see any logical reason for it to be up there. The previous owner has obvoiusly let water sit in there for a long period of time as the bottoms of the fenders are rotted ( to be expected) however the entire boot floor pan is destroyed and i will replace this with fresh sheet metal. Unfortunatly I dont have a 'parts car' to cut a panel out from to replace it with but due to the price these types of cars carry in australia and the fact that im trying to do this job for a small cost compared to what a shop would charge we have to make do. It will be fine just wont appear 'stock' like the other rust repairs I carry out.

Anyway I'll update this over the next 2+ months as the rebuild progresses since the only person im linking this too is the owner and meybe a friend or two dont expect any vast posts, im gong to try and keep it short and sweet with detailed information on the progress and pictures and any decisions that are made.

Brad
trynslide[at]hotmail.com